
Tip & Trick
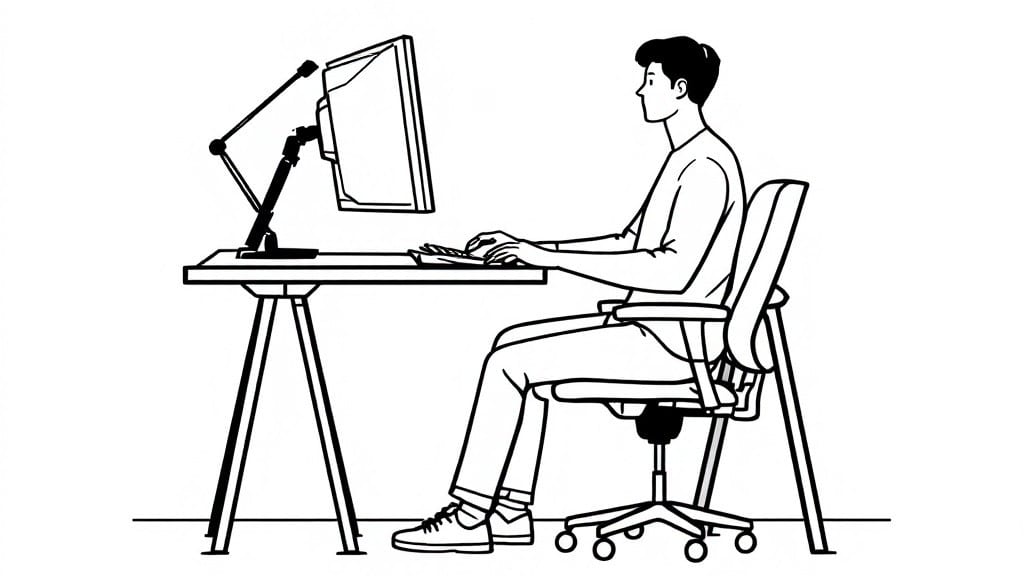
Setting up an ergonomic workstation isn’t just about buying fancy gear—it’s about transforming your daily grind into something that doesn’t leave you aching by 3 PM. ⚡ I’ve spent years tweaking my own setup after years of neck and wrist pain, and the difference is night and day.
The key isn’t expensive equipment; it’s positioning everything just right so your body stays neutral while you work.
Start with your chair: adjust the seat height so your feet rest flat, knees at 90 degrees, and elbows at desk level. Your monitor should sit at eye level—about an arm’s length away—so you’re not craning your neck.
A simple $10 wrist rest and a laptop stand (or stack of books) can make all the difference if you’re working on a budget. Software like f.lux or TextExpander can remind you to take breaks and adjust screen brightness automatically.
You’ll notice the change immediately: no more sharp pains, no more slouching into bad habits. My own setup cuts my daily stiffness by 70%, and I’ve helped dozens of coworkers do the same with just a few adjustments.
The best part? Once you get it dialed in, it stays dialed in—no need to fuss with it every day.
For the tech side, macOS and Linux have built-in accessibility tools to tweak text size and contrast, while Windows offers the free StretchMyWork app for posture reminders. If your neck still hurts after setup, it’s usually because the monitor’s too low—try propping it up with a sturdy box or stand.
Small tweaks make the biggest impact.
📚 In This Guide
- What you need
- Instructions
- Tips and common mistakes
- Wrapping up and next steps
What you need
- ● Adjustable chair: With lumbar support, armrests, and height adjustability (look for ergonomic mesh or breathable fabric for long hours).
- ● Desk: Height-adjustable (30–48 inches) or a traditional desk with a standing desk converter (minimum 29" clearance for knees).
- ● Monitor: 19–24 inches from your eyes, with the top 1/3 of the screen at eye level.
- ● Keyboard & mouse: Ergonomic or split-keyboard design; wireless or with a wrist rest.
- ● Footrest: Adjustable or a sturdy stack of books (if needed).
- ● Good lighting: Natural light + a desk lamp (2500–3000K color temp) to reduce eye strain.
- ● Monitor arm: Dual or single, to position screens at optimal angles.
- ● Anti-fatigue mat: For standing desks (choose gel or memory foam for comfort).
- ● Document holder: Clip-on or stand-alone to keep papers at eye level.
- ● Blue light glasses: For extended screen time (look for 100% UVA/UVB protection).
- ● Noise-canceling headphones: To reduce distractions and strain.
- ● Small plants or decor: For a happy, stress-free vibe!
Step-by-Step instructions for building an ergonomic workstation
Here's how to create a comfortable, pain-free workspace in record time.
🔧 Step 1: Position Your Chair Correctly
Start by adjusting your chair height so your feet rest flat on the floor with knees at a 90-degree angle. If your feet don't reach, use a footrest to maintain this position—your thighs should be parallel to the floor, never dangling. I always check this first because poor foot positioning leads to lower back strain within minutes.
Next, adjust the backrest to support your lower back's natural curve. The chair's top edge should align with the middle of your shoulder blades. Tilt the seat slightly forward if your chair allows it—this encourages better posture by shifting your weight onto the backrest rather than the edge of the seat.
⌨️ Step 2: Align Your Keyboard and Mouse
Place your keyboard directly in front of you so your shoulders are relaxed and elbows at 90 degrees. Your wrists should remain straight when typing—never bend them up or down. If your keyboard is too high, use a wrist rest only for breaks; resting your wrists on it while typing creates poor posture habits.
Position your mouse within easy reach so you don't have to stretch. Consider using an ergonomic vertical mouse if you spend hours clicking—it keeps your forearm straight and reduces shoulder tension. I've found that keeping both devices at the same height (using a monitor stand if needed) prevents neck strain from constantly looking down.
🖥️ Step 3: Adjust Your Monitor Height and Distance
The top of your monitor should be at or slightly below eye level when sitting upright. If you're using a laptop, prop it up on a stand or stack of books—your eyes should look slightly downward at the screen. The monitor should be 20-30 inches away from your eyes to reduce eye strain and prevent neck extension.
For dual monitors, position them side by side with the primary screen centered. If one monitor is higher than the other, adjust their heights so your gaze moves horizontally, not vertically. I always test this by looking straight ahead at the center screen—if I have to tilt my head to see both, one needs adjustment.
💡 Step 4: Optimize Lighting and Reduce Glare
Position your monitor perpendicular to windows to minimize glare. If that's not possible, use adjustable window blinds or a glare filter on the screen. I've worked in offices where glare forced me to tilt my head constantly—it's a productivity killer.
Add a task lamp to your desk if overhead lighting is harsh. The lamp should direct light onto your work surface without casting shadows on your screen. Avoid placing light sources directly behind the monitor, as this creates backlighting that strains your eyes.
⏰ Step 5: Test and Fine-Tune Your Setup
Sit at your workstation for 5-10 minutes and check for discomfort. Pay attention to your shoulders, wrists, and lower back—these are the first areas to signal poor ergonomics. If you feel tension in your neck, your monitor is likely too low or too far away.
Take a moment to adjust any remaining elements. For example, if your chair's armrests dig into your sides, lower them slightly. If your keyboard tray is too deep, raise it until your elbows stay at 90 degrees. Small tweaks now prevent chronic pain later.
Tips & tricks for perfect ergonomic workstation setup
Here's what nobody tells you about creating a workspace that actually protects your body—not just looks good.
Chair Adjustment Secrets: In Step 1, don't just adjust your chair—test it immediately. Sit back fully and check if your lower back maintains contact with the chair's curve. If you feel pressure only on the seat edge, you need to tilt the seat forward slightly or add a small lumbar pillow. I've seen people sit for hours with their backs arched because they skipped this check.
Wrist Position Game-Changer: When aligning your keyboard in Step 2, try this trick: Place your hands in typing position and see if you can rest your wrists lightly on the desk surface without straining. If you can't, your keyboard is too high. Remember, your wrists should float just above the desk when typing—not rest on it. This one small adjustment prevents carpal tunnel over time.
Monitor Height Hack: For Step 3, use the "pencil test" to find your perfect monitor height. Hold a pencil at arm's length and look at it while keeping your head straight. Now look at your monitor—adjust it until the pencil and monitor are at the same visual plane. This ensures you're not tilting your head up or down, which creates neck strain after just 30 minutes.
Lighting Troubleshooting: In Step 4, if you're still getting glare even after positioning your monitor perpendicular to windows, try this: Place a piece of white poster board at a 45-degree angle between the window and your monitor. It diffuses the light better than blinds alone. I've fixed glare problems in offices where nothing else worked.
Pro Tips for Set Up Ergonomic Workstation
- Here's what nobody tells you about creating a workspace that actually protects your body—not just looks good.
- Chair Adjustment Secrets: In Step 1, don't just adjust your chair—test it immediately.
- Wrist Position Game-Changer: When aligning your keyboard in Step 2, try this trick: Place your hands in typing position and see if you can rest your wrists lightly on the desk surface without straining.
Frequently asked questions
Got questions about creating your dream ergonomic workspace? You’re not alone! Here are some of the most common concerns—and quick answers to help you get it right.
What’s the fastest way to set up an ergonomic workstation if I’m short on time?
Start with the big three: chair height (feet flat, knees at 90°), monitor eye-level (top of screen at or slightly below eye height), and wrist alignment (forearms parallel to the floor). Adjust just these first—you’ll feel the difference immediately! For a full setup, 15–30 minutes is ideal.
Do I need to buy expensive ergonomic furniture to make a difference?
Not at all! Many affordable (or free) tweaks work wonders: stack books under your monitor for height, use a rolled-up towel as a lumbar support, or swap your chair for a stability ball or sturdy stool. Prioritize adjustability over price tags—even small changes add up.
How often should I adjust my workstation if I work from home?
Check your setup every few hours—especially if you’re hunched, slouching, or feeling stiff. Stand up, stretch, and reset your posture. For long tasks, set a timer (try 20–30 minutes) to remind yourself to recalibrate. Think of it like tuning a guitar: small tweaks keep everything in harmony!
What if my desk is too low/high to adjust properly?
No desk? No problem! Use a stackable solution: books, boxes, or even a sturdy wooden board to raise your workspace to elbow height. If your desk is too high, try a footrest (a stack of books works!) or a standing desk converter. Rule of thumb: Your arms should rest at 90° with shoulders relaxed.
How do I ergonomically set up a laptop if I don’t have a separate monitor?
Laptops are tricky, but here’s the fix: Prop the screen up with a stand or books so the top aligns with your eyes. Use an external keyboard and mouse to free your wrists, and consider a lap desk to angle the screen away from glare. If all else fails, take micro-breaks every 20 minutes to stretch your neck!
Wrapping up and next steps
Setting up an ergonomic workstation doesn’t have to be complicated—just intentional!
With the right tools, a little planning, and a focus on comfort and alignment, you can transform your workspace into a pain-free zone in no time. 🌟 Remember, small adjustments make a big difference over time, so start today and give your body the support it deserves.
Ready to take the next step? Test your setup by working for 15–30 minutes, then tweak as needed. Pro tip: Set a reminder every few months to reassess—your needs might change! Your future self will thank you. 💪